Emma Lovell Yoga

This content shows Simple View


Category Archives home practice

The eyes

‘…our bodies are casted not only by what we do, but by what we don’t do. For example, many of us have “casted” the ciliary muscles of our eyes through exceptionally high amounts of close-looking (computers, smart phones, iPads, books, the walls of our homes, offices and classrooms) and exceptionally low amounts of looking to great distances.’  Katy Bowman.  See full article here for further explanation.


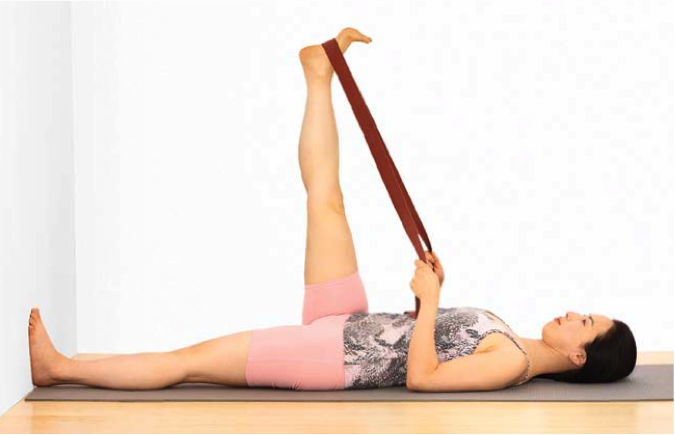
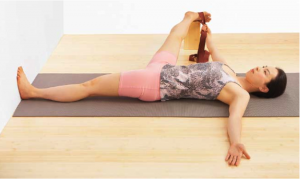
Here are a few exercises you might like to try to improve muscle weakness around the eyes and to help eyes strain.


tibetan eye chart

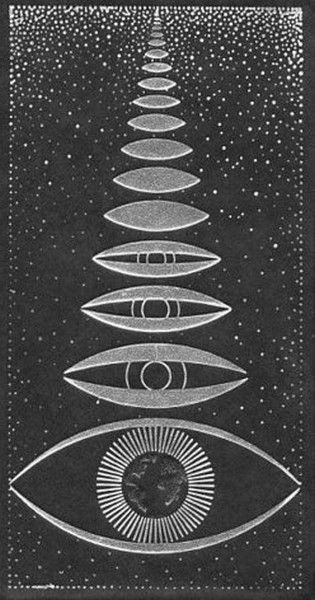
For generations the people of Tibet have used natural methods to correct visual weakness and improve their eyesight. Chief among the methods employed has been the use of certain exercises which have proved useful over long periods of time. The figure on this chart was designed by Tibetan Lama Monks to give the necessary corrective exercises and stimulation to the muscles and nerves of the optical system. The eye Muscles focus similar to a camera shutter. The purpose of these exercises is to strengthen the eye muscles to improve vision. Practice a few minutes morning and evening and see if you notice its effects.

How to Use the Chart

These exercises are to be done without eyeglasses or contacts. Do each movement for 30 seconds while in a sitting position, spine straight and do not move the head side to side. Move only the eyes.

1.) With the palm of each hand cup both closed eyes to relax them.

2.) Move the eyes clockwise around the outer circle of dots

3.) Repeat this movement in a counterclockwise rotation

4.) Move the eyes back and forth between the dots at 2 and 8 o’clock

5.) Repeat this movement back and forth between dots at 4 and 10 o’clock

6.) Blink the eyes briefly and finish therapy with the palming same as exercise #1

Repeat exercises as desired being careful to avoid strain.

Source:  http://www.wellnesshour.net/tibet.htm via here.


Here’s a couple of exercises from this article in Yoga International:

1. Palming

 Rub your hands together for 10 to 15 seconds until they feel warm and energized. Then gently place your hands over your eyes, with the fingertips resting on the forehead, the palms over the eyes, and the heels of the hands resting on the cheeks. Don’t touch the eyeballs directly, but hollow the hands slightly and allow them to form a curtain of darkness in front of the eyes. Close your eyes, breathe deeply, and relax. Envision the eyes absorbing the darkness like a sponge, while also welcoming healing warmth and energy from the hands. Invite the eyes to grow soft and spacious, and enjoy this break from visual stimulation. Continue this palming action as long as it feels soothing—for just a few seconds or up to five minutes. When you are ready to emerge, gently remove the hands from the face and slowly open the eyes.

This palming technique can also be done after the eye exercises that follow to further rest the eyes.

2. Eye Rolling

 Sit upright with a long spine and relaxed breath. Soften your gaze by relaxing the muscles in your eyes and face. Without moving your head, direct your gaze up toward the ceiling. Then slowly circle your eyes in a clockwise direction, tracing as large a circle as possible. Gently focus on the objects in your periphery as you do this, and invite the movement to feel smooth and fluid. Repeat three times, then close the eyes and relax. When you’re ready, perform the same eye-rolling movement three times in a counterclockwise direction.


As with all movements in the body, variation is key- try to vary your focus by spending some time looking at the furthest thing you can see in the distance, watch sunsets, sunrises, the horizon.  Give your eyes a real break and test your proprioception by practicing a sun salutation with your eyes closed, try a balance with your eyes closed and notice the difference.


Low back sequence

A sequence for a tired and achy low back.  You will need:

A wall

A strap/belt

A block/cushion

A bolster (optional)

1. Begin in legs up the wall pose.  If you don’t have wall space you can place your calves on the edge of a bed or chair.

2. Then press feet to the wall and bend knees to peel the back of the body off the floor and down again.

 Image result for bridge up wall yoga

3. Reclined pigeon with wall

4. Easeful rest pose then roll knees from side to side keeping feet hip width.

5. Supta padangusthasana- press the ball of the foot up into a belt, then turn your foot away from you and take the leg out to the side, making sure both sides of the pelvis stay level on the floor.

5. Balasana (option with bolster/cushion between legs).  Place a block under the head if the forehead doesn’t reach the floor.


6. Cat and cow

7. Sphinx pose

8. Supported bridge (make sure block is placed under pelvis rather than low back).


9. Reclined twist

10. Savasana


Home practice

We’ve been exploring practicing yoga at home this week.  Many people find once they have been attending a regular yoga class for  a while they want to start putting what they have learnt into practice at home.  But where to start?

Practicing yoga at home is really different from going to a class, and it can be a really hard thing to get motivated to do.  You don’t have a teacher telling you what to do or guiding you through a carefully sequenced class.  It’s just you and your body and a load of postures you’re not even sure you have right!  I know I have struggled to build up a regular home practice in the past, mainly because I told myself I didn’t have the time or a quiet enough space in which to do so.  Here are some tips and ideas I’ve learnt from teachers and my own practice that may help inspire you to get on your mat:

– Before you start, ask yourself what you need from your practice at that moment– it will be different every day.  Perhaps you have a sore neck and so make that your focus of your movements.  Maybe you feel tired and so want a more restorative practice, or maybe because you’re tired you’d like to feel more energized and so a bit of handstand practice or sun salutations would work.  

– Listen to your body and don’t force yourself to practice something you don’t want to; your practice shouldn’t be a chore to get through, but something enjoyable:

‘We’re trying to make our life listen to our practice. So let your practice conform to your life. Don’t make it something outside the boundaries of where you are and what you’re feeling and what you’re needing.‘ Read Judith Lasater’s full interview on home practice here– it has some really useful tips.

Home practice doesn’t have to be long, some days it may be 5 minutes, other days you might find you have been practicing for over an hour.  It also doesn’t have to take place in an ‘appropriate’ quiet space.  Although it can be nice to dedicate a space just for your practice, some days I like to practice out in the garden, with all the distractions that go with that.  Other days there might be lots of noise/people around the house, and some days I may not even have a mat with me.   It’s about being creative with what you’ve got.  Instead of trying to shut them out, work with the distractions and see what comes up in your body and thoughts as you practice- you may even find that your focus improves as a result.

– Get familiar with the basic poses and maybe just practice one or two poses a day.  Don’t worry about ‘doing it right’-  as long as you are not in pain, just go with the pose as you know it – notice how it feels for your body- what would make it better, what could you soften.  Keep asking questions.  As you become more familiar with the poses, you may then start building them into sequences.  Another idea is to practice a sequence from the class you attended that week (see below for some of the more familiar sequences that we practice in class).

– As you practice, observe and listen to the body.  Notice what shapes the body prefers/doesn’t prefer. Notice what your favourite pose is and what your least favourite pose is.  Notice the habitual patterns you hold in the body- do you always step back to downward dog with the same leg?  Is one leg easier to balance on than the other?  For every pose see if there is something you can take away or soften, something you don’t need (e.g clenching your toes in tree pose, holding in your belly in tadasana).  As you become more aware of the body and its patterns it will be easier to tune in and see what you need from your practice at that moment.

Explore, experiment, and have fun!  Remember that it doesn’t matter what you look like it the shape, it’s how it feels- play around with the shapes, make mistakes.

Keep it simple.  You don’t have to plan elaborate sequences or try and get yourself in the most extreme shape you can.  Listen to your body and go from there. Home practice for you today may just be sitting on a cushion and listening to your breath.


Here are a few sequences for you to try at home (they should be pretty familiar if you come to my classes already):

1. Tadasana (mountain pose), Uttanasana (forward fold), Ardo mukha svanasana (downward dog), Malasana (squat), ardo mukha svanasana, uttanasana, tadasana,

2. Tadasana, uttanasana, ardha uttanasana (half forward fold), right leg step back to low lunge, ardo mukha svanasana, right leg step forward to lunge, ardha uttanasana, uttanasana, tadasana.  Repeat on left side.

3. Balasana (child’s pose), cat/cow, bhujangasana (cobra), ardo mukha svanasana (downward dog), plank, balasana. Repeat.